The road to loving my kitchen has been a long and obsess-y one. When we moved in, the kitchen/dining room space was just a sad little "L" shape of cabinets with rusty brass knobs moping over some stained and torn linoleum. Our house had been a very low priced foreclosure and it seemed like the last owners wanted to make sure that the new people, or bank or whoever knew how unhappy they were when they left. At the scene of the crime there was an unidentifiable substance splashed on the walls which may have been the setting for a low budget horror film. I was envisioning someone taking everything that was left in the fridge, throwing it in a blender then slopping it on every wall in the house. Not kidding. But the walls in the kitchen were especially bad.
I went all through my pictures but I couldn't find one of the kitchen in it's full horrific glory. But the picture below on the left if what it looked like when we moved in, after we painted the walls and ceiling a light gray. The picture on the right was taken about a month after, once we'd put in appliances and hung a neat island light over our invisible island.
Now don't get me wrong, what we had is a completely acceptable, functioning kitchen. It's not bad and if your kitchen looks something like the one on the right you should know that I do not judge your kitchen. If it looks like the one on the left I'm going to ask you where you keep your food. But anyways, by this time I'd already discovered Pinterest or some such nonsense and wasn't happy with acceptable and functional anymore because I'd seen this picture.
OMG. Cue singing angels.
I decided to start with the counter tops. Here they are, close up. It was a perfectly fine, acceptable color but it was driving me nuts. You can see here that the hardware is no longer brass; they gave me a headache after about 10 minutes so I spray painted them. It would have been better to just buy new hardware but they've held up pretty well considering it's just spray paint.
"Hi! I'm completely acceptable!"
Materials
I got a Rust-Oleum Countertop Coating kit which I picked up at an estate sale store for $10. I took it to Home Depot and they tinted it for me for free! I felt a little bad about it, like I was stealing since I didn't buy the countertop coating from them. But I did get the Krud Kutter, Blue tape and a mini roller for about $15. (What you need is a FOAM mini roller, not the regular fuzzy kind. For some reason I knew this then bought the fuzzy kind and when I got to the actual painting I kept having to pick little fuzz balls off the countertop...)
Stand In Kitchen
I made sure that I had my coffee pot and everything I would need for basic survival all set up in an easily accessible place. Once you apply the counter top coating you can't touch them for three days. THREE DAYS!
Tape off e v e r y t h i n g
I'm usually not very careful so on this part I tried to be as unlike myself as possible. I imagined every stupid thing that I could get paint on and put tape on it instead. I taped a plastic bag over my faucet as well.
I'm pretty sure I watched this how-to video on the Rust-Oleum website about 12 times. I was terrified at the thought of actually doing this but it turned out to not be that hard.
Clean and sand
I cleaned everything really well with Krud Kutter. This stuff is awesome; it will get off any grease or nastiness. Then I lightly sanded the countertop.
Paint backsplash
I started with the backsplash then moved to the sides and corners of the countertop. Pretty much anything that needed to be done with a brush. Then I came back with the roller. I did three coats on mine.
Here's the counters post-painting. Just waiting for it to dry! I normally would've just pulled all the tape off the second I got done painting but I tried to be really unlike myself here too. I was actually patient if you can believe it.
The dogs were seeking refuge from the fumes on the deck all day... "Why are brain-damaging us Food Lady?!"
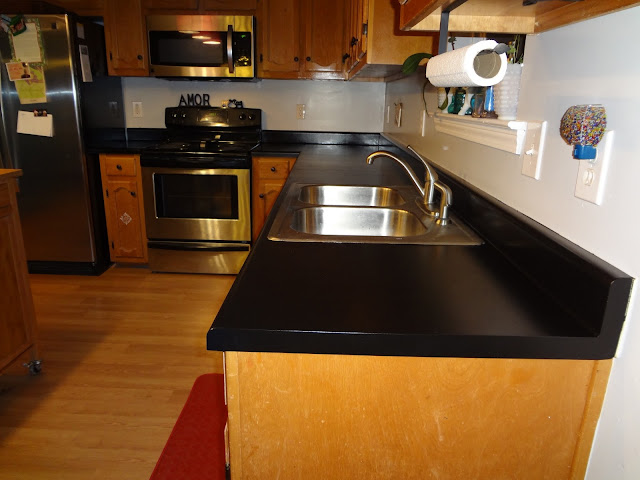
All done!
I like my countertops soooo much better now that they are not the color "perfectly acceptable granite." It wasn't an overwhelming amount of work or anything; I think most importantly you just need to be prepared. If you decide to try it I'd recommend you do it when the weather is nice because this stuff smells like you would not believe. We had all the windows open for two days and my husband was talking about ditching and sleeping at a hotel. We did tough it out but, be warned. Also, plan to throw out your brushes and rollers. If you try to wash them out and touch it you'll need about a gallon of paint thinner to get it off your hands. Believe me, I did it!
So now that it's been about a year, I've got to say there are a few scratches and knicks here and there. It's definitely not as good as replacing a countertop, but a new countertop costs way more! And if it really starts to drive me nuts I can always just do another coat.
Stay tuned for part 2 and 3!


No comments:
Post a Comment