view sourceprint?01 09 10

Background

Friday, May 17, 2013

Bentwood Rocker Facelift

 
A favorite pasttime of mine and my husband's is to "go junking."  Whenever we feel like we need to go do something fun for a day, we head off to search out any and all thrift stores within a day's drive.  I guess I should be glad that we don't have more expensive tastes but really, we are terrible.  One year for our anniversary we drove to Phoenix (we lived in Arizona then), stayed in a nice hotel and went to different thrift stores for three days. THREE DAYS!  Sometimes I just have to laugh about that because out all the things we could've done (like gone on a real vacation) we chose three days of uninterrupted treasure hunting.

Even if we are ridiculous, sometimes it does pay off.  When I came across this rocker in a thrift store recently I just stared at it, probably for a solid 10 minutes, making sure that I was understanding what I was looking at.  Usually when I see something really cool for a ridiculously good price, I'm reading the tag wrong or it was a typo.  But not this time!  I was able to score this beauty for only $15!  It was a little worse for the wear when I found it, but luckily the only problems were cosmetic and it was an easy (if not a little time consuming) fix.


  The Full House era cushion was coated with a thick layer of dust and I think dander from a cat who was very well loved, I'm sure.


The finish was chipping off in places...


And there were remnants of a past remodeling project.


After I had the rocker in pieces and I'd pried out all 6,000 staples that was holding the old fabric on, I carried everything out to the porch.  I spent an entire morning sanding this baby down with a hand sander.  It worked great; the problem was that it didn't fit in between all the bends and curlicues.  Those had to be done by hand.


I used two cans of spray polyurethane.  It was easier than painting it on with a brush but probably more expensive.  It was about $7 a can but it was just about foolproof.  Here's an in-progress shot.  The left side of the rocker has one coat of poly and the right one is unfinished.


Sparkling after three coats!


While the polyurethane was drying I got to work on the cushion.  The rocker originally had a cane seat that a previous owner had replaced with the cushion, so there was already this nice piece of plywood cut to the perfect size.  The seat only had a 1" chair pad on it and wasn't some place that you wanted to sit for very long! I went down to the fabric store and got some new 2" thick foam to help it out a little.  Way better.


After I stretched the fabric over the cushion and stapled it to the bottom of the plywood seat, I had to figure out how to attach it back onto the rocker since I was doing it differently then how it was when I found it.  When I asked my brain what to do it said, "Stop trying to trick me.  That's probably math or something," and refused to help.  Husband suggested that I make the seat how I wanted and attach it with L brackets, so that is what I did.  Since the plywood sits on top of the seat, it didn't need to be able to hold a ton of weight, just make sure they seat didn't fall off.  Here's a shot of him, being awesome.


And here's what those L brackets look like underneath.


And here it is finished! 


Check out those sexy curves!


Now I have a cute little reading chair in my office. And the best part is, the dogs won't bug me when I sit in it! They try to put their paws on me and poke me with their poky toes but that makes the chair move, which is terrifying.  It may be the only thing any of them are afraid of, short of being put on top of the entertainment center (I am not responsible for that).


Does anybody else have any trash-to-treasure projects they've been working on?

Sunday, April 14, 2013

New Cabinets for $40, Part 2

 
If you read my last post, you know all about how our kitchen was much improved by painting the countertops black which I posted about here.  I had painted the little white medalions on the lower cabinet doors but later realized something more drastic needed to be done...


Obviously, the best way to start any big project is to first gather all the materials you'll need and a trusty assistant.  Check.


I figured what I wanted to do (probably) was to paint everything white.  So I started by taking everything out of the drawers and making as big of a mess as possible. 


The drawers came out and the doors came off.  I taped off as much as my patience would allow before I started painting.  I cleaned everything well with Krud Kutter, took off all the cabinet hardware and filled whatever dings I could with wall putty.  I didn't really sand but it probably would've come out smoother if I had.  I did one coat of Kilz Primer and then two more coats of white paint.
 
Here's some in progress shots:


Here's the finished project!  It was a big job but made our dark kitchen feel so much brighter and cheerier.  It also made me way less whiny.  I was totally obsessed with how much the kitchen sucked at the time.  Poor husband; it was probably 80% of conversation topics.


I had no complaints for months and months.  Then all the little spills down the cabinets, tongue scunge from dogs licking the spills off of the cabinets and orange paw prints started to add up.  Maybe white lower cabinets were not the best choice for our small castle of three dogs.  Unless I wanted to clean them every night (ha).
 
So I decided to repaint the bottom cabinets this bright teal color which matches the armoire we're using for a pantry.  I love them so much more now.  I'm too weird to have all white cabinets anyways. 


Good job Food Lady.  I'd lean on this cabinet any day!

So that's it for now.  Maybe my next kitchen post will be about my amazing new marble backsplash that future me will have...


Maybe.

Saturday, March 23, 2013

New Cabinets for $40, Part 1


The road to loving my kitchen has been a long and obsess-y one.    When we moved in, the kitchen/dining room space was just a sad little "L" shape of cabinets with rusty brass knobs moping over some stained and torn linoleum.  Our house had been a very low priced foreclosure and it seemed like the last owners wanted to make sure that the new people, or bank or whoever knew how unhappy they were when they left.  At the scene of the crime there was an unidentifiable substance splashed on the walls which may have been the setting for a low budget horror film.  I was envisioning someone taking everything that was left in the fridge, throwing it in a blender then slopping it on every wall in the house.  Not kidding.  But the walls in the kitchen were especially bad.
 
  I went all through my pictures but I couldn't find one of the kitchen in it's full horrific glory.  But the picture below on the left if what it looked like when we moved in, after we painted the walls and ceiling a light gray.  The picture on the right was taken about a month after, once we'd put in appliances and hung a neat island light over our invisible island.

Now don't get me wrong, what we had is a completely acceptable, functioning kitchen.  It's not bad and if your kitchen looks something like the one on the right you should know that I do not judge your kitchen.  If it looks like the one on the left I'm going to ask you where you keep your food.  But anyways, by this time I'd already discovered Pinterest or some such nonsense and wasn't happy with acceptable and functional anymore because I'd seen this picture.


OMG. Cue singing angels.


So my brain is like, "Throw everything away and buy a new one!" But that is not what actually happened.  New kitchens cost money.  Money that I don't want to spend...  And if you're not going to spend money then you need to have time and a whole lot of creativity.  I chose the second option.


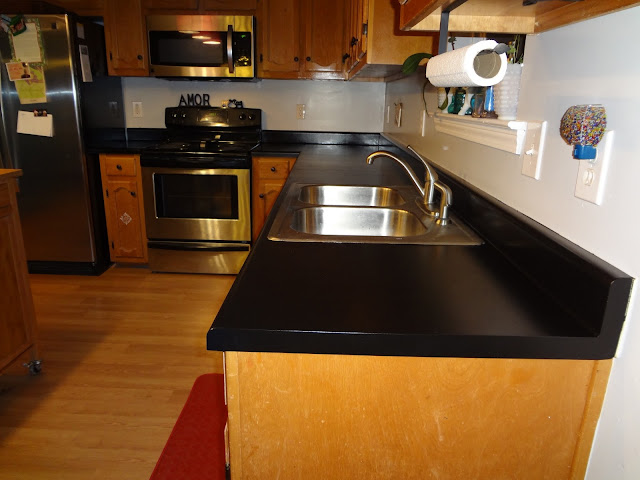
I decided to start with the counter tops.  Here they are, close up.  It was a perfectly fine, acceptable color but it was driving me nuts. You can see here that the hardware is no longer brass; they gave me a headache after about 10 minutes so I spray painted them.  It would have been better to just buy new hardware but they've held up pretty well considering it's just spray paint.


"Hi!  I'm completely acceptable!"

Materials

I got a Rust-Oleum Countertop Coating kit which I picked up at an estate sale store for $10.  I took it to Home Depot and they tinted it for me for free!  I felt a little bad about it, like I was stealing since I didn't buy the countertop coating from them.  But I did get the Krud Kutter, Blue tape and a mini roller for about $15.  (What you need is a FOAM mini roller, not the regular fuzzy kind.  For some reason I knew this then bought the fuzzy kind and when I got to the actual painting I kept having to pick little fuzz balls off the countertop...)  

Stand In Kitchen
I made sure that I had my coffee pot and everything I would need for basic survival all set up in an easily accessible place.  Once you apply the counter top coating you can't touch them for three days.  THREE DAYS!

Tape off  e v e r y t h i n g
I'm usually not very careful so on this part I tried to be as unlike myself as possible.  I imagined every stupid thing that I could get paint on and put tape on it instead. I taped a plastic bag over my faucet as well.

I'm pretty sure I watched this how-to video on the Rust-Oleum website about 12 times.  I was terrified at the thought of actually doing this but it turned out to not be that hard.

Clean and sand 
I cleaned everything really well with Krud Kutter.  This stuff is awesome; it will get off any grease or nastiness.  Then I lightly sanded the countertop.

Paint backsplash
I started with the backsplash then moved to the sides and corners of the countertop. Pretty much anything that needed to be done with a brush. Then I came back with the roller. I did three coats on mine.
  

Here's the counters post-painting.  Just waiting for it to dry! I normally would've just pulled all the tape off the second I got done painting but I tried to be really unlike myself here too.  I was actually patient if you can believe it.

The dogs were seeking refuge from the fumes on the deck all day... "Why are brain-damaging us Food Lady?!"


All done!


 I like my countertops soooo much better now that they are not the color "perfectly acceptable granite."  It wasn't an overwhelming amount of work or anything; I think most importantly you just need to be prepared.  If you decide to try it I'd recommend you do it when the weather is nice because this stuff smells like you would not believe.  We had all the windows open for two days and my husband was talking about ditching and sleeping at a hotel.  We did tough it out but, be warned.  Also, plan to throw out your brushes and rollers.  If you try to wash them out and touch it you'll need about a gallon of paint thinner to get it off your hands.  Believe me, I did it!

So now that it's been about a year, I've got to say there are a few scratches and knicks here and there.  It's definitely not as good as replacing a countertop, but a new countertop costs way more!  And if it really starts to drive me nuts I can always just do another coat.

Stay tuned for part 2 and 3!

Tuesday, October 2, 2012

Autumn on the Brain

I love to paint. Especially this impressionism style; it's like art for slackers!  Here's some play-by-play shots of what I did today.


Sunday, September 30, 2012

Be Different Like Everybody Else


I heard on the radio today that if you want to start a blog and are not sure what to do, just make it involve cats.  The internet loves cats. 

This is a cat.


The internet especially loves it when cats do things.

Cats enjoy a variety of activities.
This one is battling Decepticons.


I've put off starting this blog for a while partially because I just don't know where to start.  And because it seems like everybody else already has a blog.  Everyone. Martha Stewart has a blog. I think Al Roker blogged for a little bit. There may be a you in a different dimension that has a blog and the you in this dimension might  not even know about it. In another dimension you may also have tentacles.  In the future, this blog will not in any way involve cats or tentacles.

Cats in other dimensions have tentacles.


In the past year and a half there have been a lot changes and it's been a lot to wrap my head around it. We've moved to the other side of the country, changed jobs, made new friends, are renovating a house, changed what we eat, how we exercise, I started making toothpaste, we're recording an album and the husband and his brother are developing an indie video game.

There's been lots of exciting things happening but honestly, I've struggled getting adjusted to all the changes and finding where I fit in my own life.  Am I employee #247 at a job?  Am I best wife ever who spends all her time cooking, cleaning and making babies? Am I a musician that needs to focus on pretending to be 3,000 times cooler than I really am?  

As a musician, I understand the basic concept of rhythm.  Where I'm at now is attempting to apply that idea of rhythm to life overall.  The actual events and situations in our lives can be completely unpredictable, but that doesn't have to define us. I guess by blogging about what's happening and what I'm working on I'm trying to pin down who I was made to be at my very deepest level, so maybe I can learn to roll with punches not just with acceptance but with downright joy

Also, blogging is way cheaper than scrapbooking.